
A scene refers to the basic unit of which a video is composed. Each scene can include a transcript, media, logo, presenter, and voice. As well as the different features each scene provides.
In this article you will learn:
What is a Scene?
A video is made up of individual scenes, much like building blocks forming the foundation. In Hour One, each video is constructed by stringing together a series of scenes, which act as the fundamental units of composition. Think of scenes in the same way you consider slides in a presentation - they are the building blocks that create the final product.
The beauty of approaching video creation with this scene-based structure is the ease of editing. Since each scene stands independently, you have the flexibility to edit, duplicate, or rearrange them without impacting the entire project. This simplifies the editing process and gives you greater control over your video's flow and content.
With Hour One, you have the freedom to create mini-videos consisting of a single scene or more extensive videos comprising multiple scenes. Depending on your subscription plan, there are varying limits for scene counts: 6 scenes for the Free plan, 10 for the Lite plan, 15 for the Business plan, and 15+ for the Enterprise plan. For more details, please refer to Hour One’s pricing plans.
What does a Scene Include?
Transcript (Narration)
In each scene, you can enter text in the scene transcript box. Any text added here will be narrated by the Presenter. There is a limit of 500 characters per scene.
If you input more than 500 characters, you can easily split the text into multiple scenes using the one-click auto script splitting feature!

Scene Preview
Located on the left section of each scene, you are able to view the scene’s preview which shows the currently selected layout, presenter, media, and any titles. To view it in a bigger frame, go to the ‘Layout’ section within the ‘Scene’ tab.
Read more: Layout, Presenter & Voice
Scene Features
Each scene includes 5 options:
We recommend checking out our other articles that talk about the stand-alone features that are located in the scene like the Script Wizard, Add Audio Script, and Add Pauses.
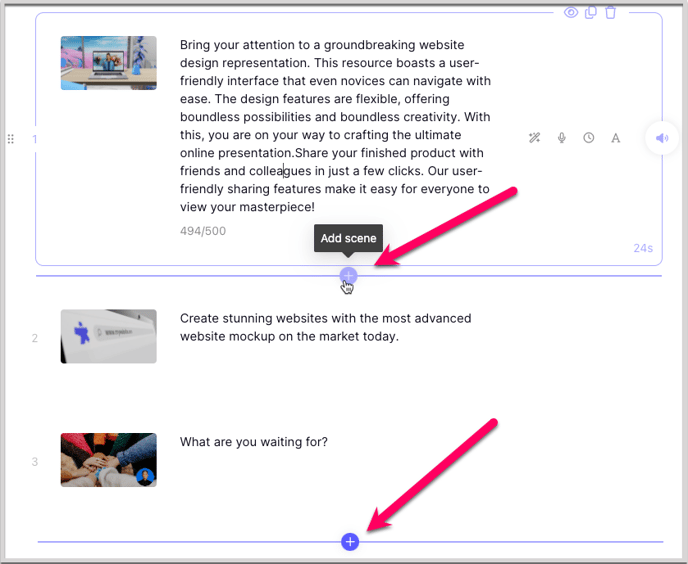
How to Add a New Scene
Click on ‘+’ icon located in between each scene (after hovering your mouse) and underneath the last scene within your draft.
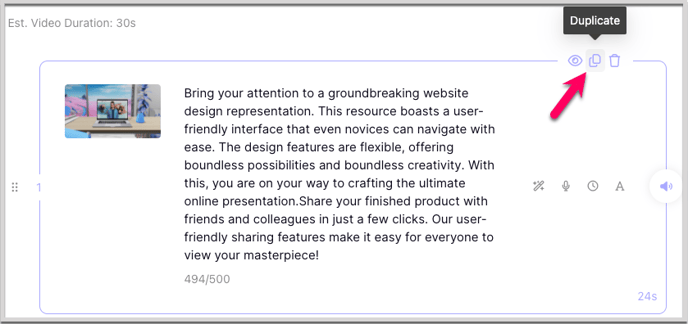
How to Duplicate a Scene
Sometimes, you may find the need to duplicate a scene. Simply hover your cursor over the desired scene and click on the ‘Duplicate’ icon. A replica of the scene you've chosen will be instantly created right below it.
How to Reorder Scenes
Any scene can be moved up or down, changing its chronological order. To change the order of a scene, hover over to the left side of the scene, then click and hold the drag-and-drop icon.
You will be able to move the selected scene in whichever order you see fit.
How to Delete a Scene
There will be times when you want to delete a scene entirely. To delete a scene, hover over it with the cursor, and click the trash icon:
Scene Timing
For each scene, you will be able to see the approximate time it will take for the transcript to be read by the selected voice before moving on to the next scene. With this, you can easily insert edited media into the scene that will time up with the transcript.
Listen Button
Probably one of the most important features within the scene is the ‘Listen’ button. Selecting the ‘Listen’ button will read out the transcript in the chosen voice. This will allow you to make any necessary wordsmithing and adjustments to the transcript until you are completely satisfied without having to generate the entire video.
Check out our article on Pronunciation!
Adding Pauses
You are able to insert pauses within the transcript, providing a natural and dynamic flow to your videos! Read more in our article about Adding Pauses!
—
Need any help with Scenes? Send us a message.